Tuesday, December 31, 2013

Rainbow Loom Bracelet...Minus the Rainbow Loom

Rainbow Looms are all the rage, lately.  I'll admit, they're pretty cool and you can make a ton of different styles of bracelets with them.  My favorite style is the fishtail.  I have one problem, though: I don't have a rainbow loom.  But guess what?  I figured out I can create this super cool bracelet on my fingers.  That's right.  On my FINGERS.  No need to go buy a loom.  Wanna know how?  You're in the right place.


This is what the fishtail bracelet looks like.  It looks exactly the same as the kind done on the loom.  The best part?  You only need 3 items and a few minutes to make this bracelet.  Let's get started!


Ok, so things you need:
  • colorful rubber bands (Or, if you don't have any, i have made a bracelet with my little sister's ponytails.  You can purchase 500+ of these for a couple dollars at Walmart.  The outcome is slightly different in size, but if you don't mind the look, by all means take the cheaper route!)
  • a C-clip (Again, there's the cheaper way of using a paperclip.  Not as comfortable, but still works.)
  • two fingers! (sorry, there's nothing cheaper than your own hand)
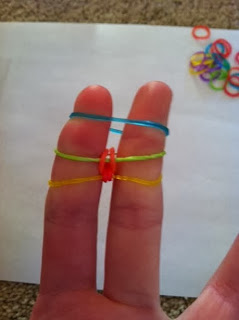
Once you've gathered your materials, take one rubber band and loop it around two of your fingers in an infinity sign or figure eight shape.

step 1
Next, loop two more rubber bands onto your fingers, but this time don't twist them.

step 2
Now take the bottom band, and pull it over the other two bands.  Drop the band in between your fingers.

step 3
Repeat on the other side.  Push down the other two bands if necessary and add another band (without twisting).
step 4
Repeat step 2 and 3:  pull the bottom band over the other two and add another band on top.

step 5
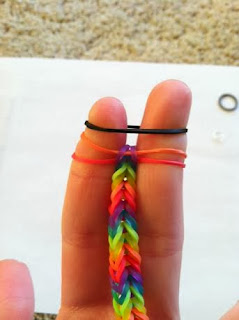
Keep repeating these steps.  It should start to look like this:


See the fishtail effect?  I hope so.  If not, I'm sorry to say you're doing something wrong :/  If yours does look like this, congrats!
Now we're just going to keep doing this until we've reached the length we want.  Loop both sides of the bottom band over, add another band on top.  Loop the bottom, add to top.  Loop, add.  Loop, add.  You get the idea.

This is about how long I needed mine:

about the length of my hand
Now, we're going to repeat the whole "loop and add" process two more times, but these next two bands will be removed later, so don't worry about the color or anything.  To illustrate, my next two bands will be black.


See? Nothing tricky.


Just looped and added.


Ok, so we just looped our last colorful band.  Don't add another one this time.  All we should have on our fingers are the two bands that don't matter.  Great.  Almost done.  Time to add the C-clip (or paperclip).


Easy peasy.  Now we can take the bracelet off of our aching fingers.  Whew!  Just be careful not to let the C-clip fall off.


Now we're going to pull those ugly black bands out of our bracelet.


Now we just connect the other end of our bracelet to the C-clip...


And we're done!!  That's it!  You did it!  Now sit back and admire your handiwork.


I hope you enjoyed this tutorial and/or found it helpful.  Now we can amaze the world with our homemade matching bracelets ;)

See you soon and happy crafting!

~Hanna


World's Best Peanut Butter Chocolate Chip Cookies

Ready for this blog's very first recipe?!  Me, too.
Today we are making these beauties.
yes, i know there's a big watermark on the picture, but
you've got to give credit where it's due, right?  i have made these,
i just don't have a picture available.

Yummy right?  I promise these will be a huge hit at any social event, or a Friday night movie....in your room....by yourself. (don't worry, we all have those days).  The point is, any reason is a good reason to make these delicious peanut butter cookies!  So without further ado....

World's Best Peanut Butter Chocolate Chip Cookies

Ingredients

  • 1/4 tsp. baking soda
  • 1 1/2 cup flour
  • 1/2 cup granulated sugar
  • 1/2 cup brown sugar
  • 1 Tbsp. vanilla
  • 1 egg
  • 1/4 cup shortening
  • 1/4 cup butter
  • As much peanut butter and chocolate chips as you want. (I think I used about a cup of peanut butter and 1/2 cup chocolate chips, but feel free to add as much as your heart desires.)
Directions

  • Mix all ingredients in a large bowl.
  • Add milk if too dry/clumpy.
  • Spoon onto cookie sheet in aprx. 1 inch balls.
  • Bake at 375(F) for 10 minutes.
  • Enjoy!!
Now how easy was that?!  This is one of my favorite recipes because you can customize it and it always turns out amazing!  To make this recipe a little healthier (although let's face it-cookies are not healthy), you can try substituting unsweetened applesauce for butter, whole wheat flour for white flour, and dark chocolate chips for milk chocolate.

Let me know if you try them out!  I hope you love this recipe as much as I do!

~Hanna

Not-so-formal Introduction

Hello fellow internet surfers!  I'm glad you found me!  As you can probably tell, I'm just getting started on this blog.  I have big plans for it, though!  I love experimenting with food, hair, and just about everything I can get my hands on!  I hope to share my discoveries with you, including full length tutorials with pictures.  Now I can't tell you exactly what all will be on this blog, but look for tutorials and inspiration for food, hair, nails, health, and crafts.  Well, that about wraps it up for today.  Be sure to check back in!  See you soon!
~Hanna